Printable Floppy Eared Bunny Sewing Pattern
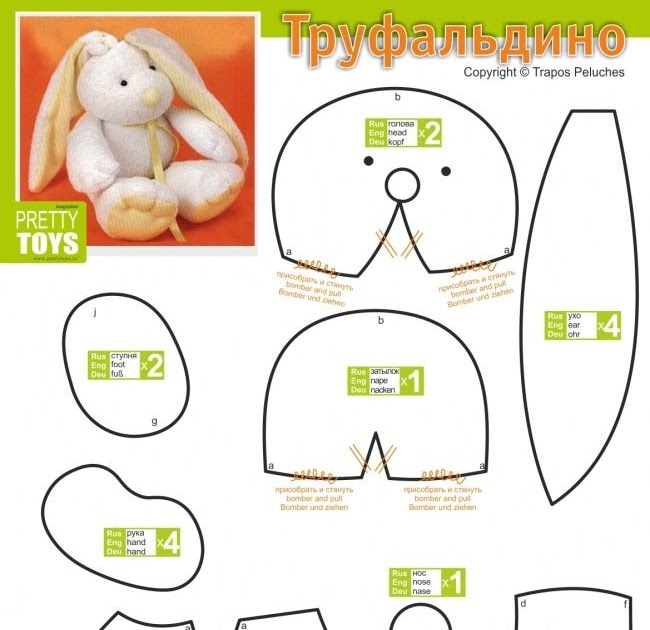
Printable floppy eared bunny sewing pattern - Cut a length of yarn around 8′′ and thread through the rem sts, stitch the head seam to the end of the nose. 3.trace the templates onto the fabric using a chalk pencil, regular pencil or 'disappearing ink fabric marker'. You need to seam from both ends and leave. Repeat the same to the other ear piece. If you would like to make a. Place the completed bunny ear and bunny foot patterns on the folded cotton. (i use this type of pattern. This adorable floppy eared bunny hat is the perfect handmade baby shower gift. They are so quick and tip! Sew around the sides with a 1/2” seam allowance, leaving the bottom open.
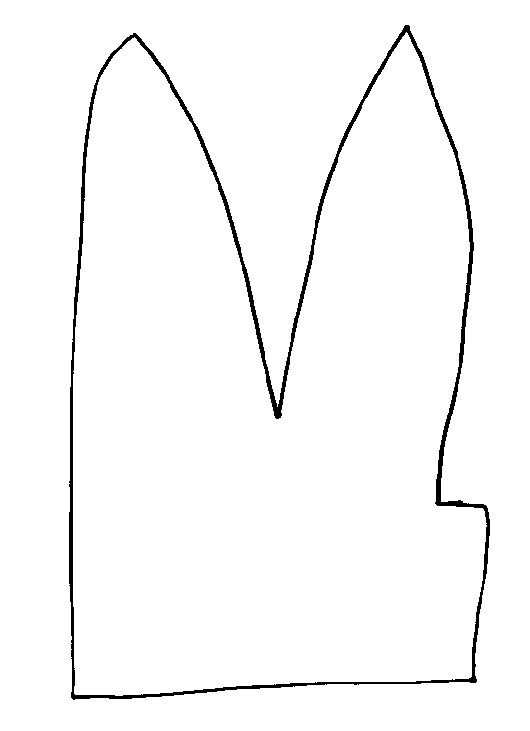
Cut pattern pieces out 1.print out the templates. The sweet floppy bunny pattern comes with a free, printable sewing pattern that makes sewing up a bunny just a hop and a skip away. Using a piece of computer paper trim the top part as shown. There the pattern is done, it’s that easy! The bunny ears are 4 apart for an adult size.

Printable Floppy Eared Bunny Sewing Pattern
Let’s make the pattern for floppy! Find and download printable floppy eared bunny sewing pattern image, wallpaper and background for your iphone, android or pc desktop.realtec have about 36 image published. Place the completed bunny ear and bunny foot patterns on the folded cotton.

Template Free Printable Floppy Eared Bunny Sewing Pattern / Floppy Eared Heritage Bunny in 2020
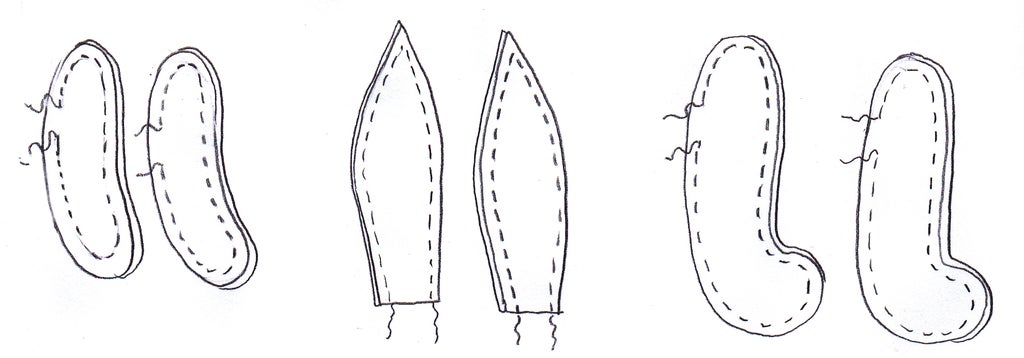
Pin in place and cut out the pieces (two ears and two feet). Place the completed bunny ear and bunny foot patterns on the folded cotton. Crochet bunny hat (with floppy ears!) free pattern + tutorial.
Template Free Printable Floppy Eared Bunny Sewing Pattern / Follow the directions on the templates.
Place the completed bunny ear and bunny foot patterns on the folded cotton. They are so quick and tip! Finished doll stands about 13 tall.

Template Free Printable Floppy Eared Bunny Sewing Pattern / Printable Floppy Eared Bunny Sewing
Make this lovable, stylish bunny doll with dress, bonnet and bouquet for easter gift giving or for any time! Using a piece of computer paper trim the top part as shown. Cut pattern pieces out · step 2:
Template Free Printable Floppy Eared Bunny Sewing Pattern Floppy Eared Bunny Sewing Pattern
Place the completed bunny ear and bunny foot patterns on the folded cotton. This adorable floppy eared bunny hat is the perfect handmade baby shower gift. They are so quick and tip!

Pin on Toys to make
Place the completed bunny ear and bunny foot patterns on the folded cotton. The sweet floppy bunny pattern comes with a free, printable sewing pattern that makes sewing up a bunny just a hop and a skip away. There the pattern is done, it’s that easy!

Template Free Printable Floppy Eared Bunny Sewing Pattern / Printable Floppy Eared Bunny Sewing
You need to seam from both ends and leave. Repeat with the remaining 2 ear pieces. Find and download printable floppy eared bunny sewing pattern image, wallpaper and background for your iphone, android or pc desktop.realtec have about 36 image published.
Template Free Printable Floppy Eared Bunny Sewing Pattern 11 Lacy Bunny Floppy Eared Bunny PDF
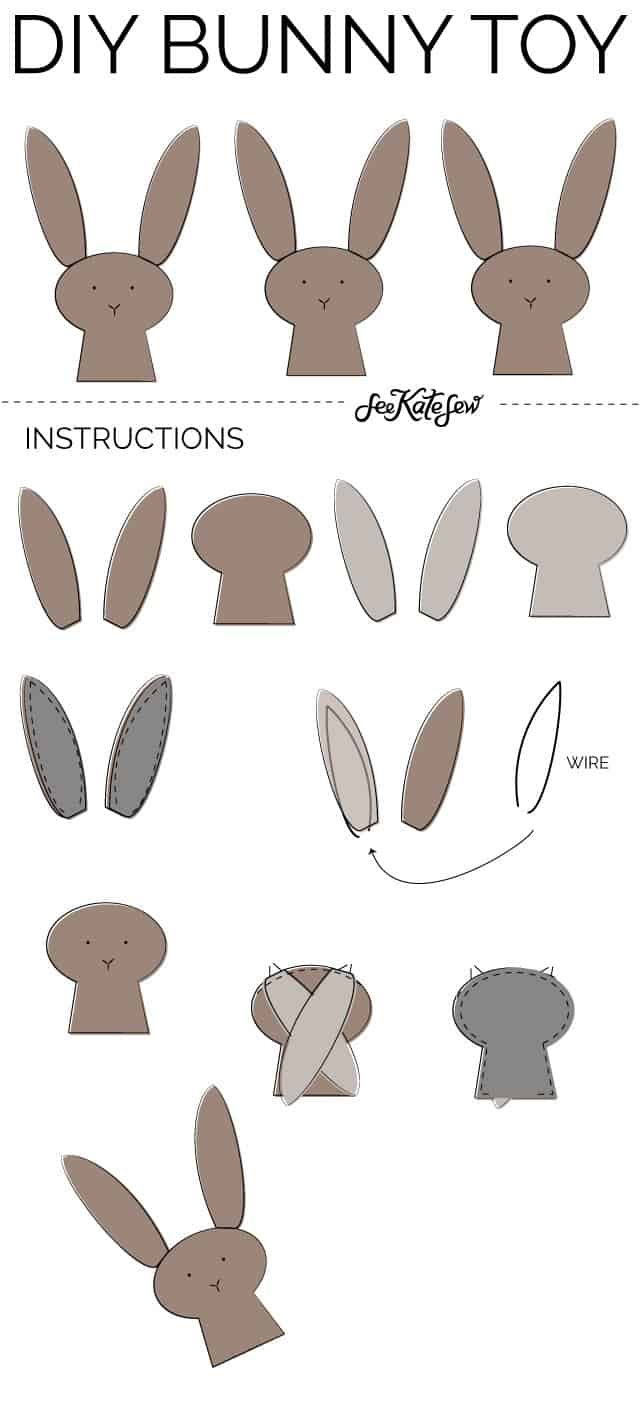
(i use this type of pattern. Sewing the arms, legs and ears · step 3: There the pattern is done, it’s that easy!
Template Free Printable Floppy Eared Bunny Sewing Pattern Pin On Stuffed Animal Patterns
They are so quick and tip! You need to seam from both ends and leave. Floppy eared heritage bunny · step 1:

Template Free Printable Floppy Eared Bunny Sewing Pattern / Rabbit sewing pattern hop to it
Mark the bunny ear position at the headband. 3.trace the templates onto the fabric using a chalk pencil, regular pencil or 'disappearing ink fabric marker'. They are so quick and tip!
Floppy eared heritage bunny · step 1: You need to seam from both ends and leave. Cut a length of yarn around 8′′ and thread through the rem sts, stitch the head seam to the end of the nose. Place the completed bunny ear and bunny foot patterns on the folded cotton. Crochet bunny hat (with floppy ears!) free pattern + tutorial. 3.trace the templates onto the fabric using a chalk pencil, regular pencil or 'disappearing ink fabric marker'. Cut pattern pieces out · step 2: Cut pattern pieces out 1.print out the templates. Place the completed bunny ear and bunny foot patterns on the folded cotton. Cut notches · step 4:
Make this lovable, stylish bunny doll with dress, bonnet and bouquet for easter gift giving or for any time! This adorable floppy eared bunny hat is the perfect handmade baby shower gift. If you would like to make a. Repeat the same to the other ear piece. The instructions and free pattern download focus just on the. Mark the bunny ear position at the headband. Finished doll stands about 13 tall. They are so quick and tip! Repeat with the remaining 2 ear pieces. Sewing the arms, legs and ears · step 3:
Place 2 of the ear pieces rst. (i use this type of pattern. There the pattern is done, it’s that easy! The bunny ears are 4 apart for an adult size. Using a piece of computer paper trim the top part as shown. Fold and stitch the ear's bottom. The sweet floppy bunny pattern comes with a free, printable sewing pattern that makes sewing up a bunny just a hop and a skip away. Find and download printable floppy eared bunny sewing pattern image, wallpaper and background for your iphone, android or pc desktop.realtec have about 36 image published. Let’s make the pattern for floppy! Pin in place and cut out the pieces (two ears and two feet).